Thursday, January 27, 2011

Put it in Neutral


I hear this often..."When I'm done organizing a project, why doesn't it ever look like this"? Inevitably, I'm shown a variety of magazine or catalog tear-sheets featuring beautifully designed pantries, closets, cabinets or drawers.

Before being escorted to the project, I already have a good idea of what's inside; a mish-mash of space-wasting boxes, bins or plastic containers that don't fit together well, and a lot of color, pattern and texture. The result? Visual chaos.

I often talk about "good flow" when referring to a well-designed and decorated home. Flow is created by honing in on a few well-thought out and designed details, then repeating them throughout the house. 

And, it's exactly that same principal when organizing. A few, well-designed storage solutions can beautifully and seamlessly flow throughout every storage area in your home.

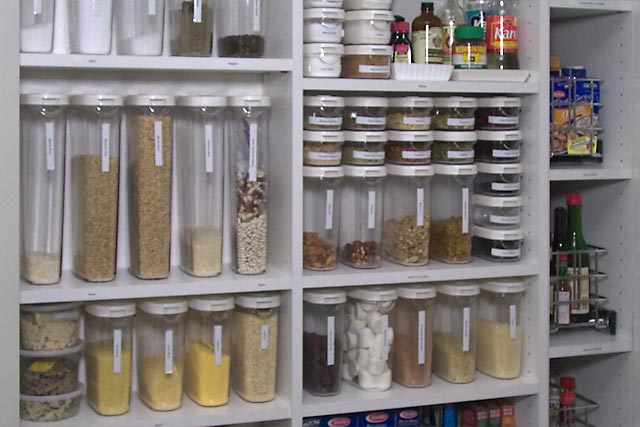
Here's the key; a neutral color palette like white, ivory, cream, soft greys, tans and natural woods, NEVER goes out of style. It's easy to get caught up in all of the fabulous storage solutions now available. However, if you stick to one "look" and use it throughout, it will easily morph from room to room, creating "flow" as well as a sense of peacefulness.


Here are a few of my favorites;
Neutral colored canvas bins available in a variety of sizes, easily flow from room to room.
Clear glass and plastic containers especially in the kitchen, bath and laundry room. I like these, these, and these.
Galvanized buckets and bins contain everything from firewood to hats, gloves and shoes.
• Simple trays for folded shirts on a closet shelves.
Natural baskets for books, magazines, towels, etc.
• White Kassett storage boxes from Ikea and natural canvas bags store out-of-season clothing and bedding.
• My collection of white dishes and enamelware (see January 25th post).

That said - a pop of color here and there keeps things interesting.

If you keep it simple, keep it neutral, and stick with your system, your home will be beautifully organized. Literally, from the inside out.




Tuesday, January 25, 2011

Stylish Organizing Solutions


Cleverly thought out, items of everyday life can morph into interesting, useful and beautiful organizers.

I have a few rules about my "organizing tools". First, they must be simple, yet beautiful and of course - functional. Second, they must seamlessly work from room to room, closet, cupboard or drawer throughout the house. Finally, they must serve more than one purpose.

Before getting started on any organizing project, I look around to see if there is anything interesting that I already own that I can use. Some of my collections often become handy organizers.

For example; Last spring my husband had a medical emergency, ended up in surgery and after a week in the hospital came home with a double fist-full of prescriptions! Not used to having pills as part of his daily routine, I quickly needed some way to keep them organized and easily accessible.

On my kitchen table I keep an old, white enamel roaster, (part of my collection of vintage enamelware). It had previously held fruit or veggies for the week or maybe Paperwhites during the holidays. But, it was perfect for corralling his prescription bottles. I repurposed it and now store vitamins and his prescriptions in it, reminding us to take them everyday.

Here are a few other ideas to get you thinking;

Vintage crocks; Kitchen workhorses in years past, these containers work beautifully to organize whisks, wooden spoons, spatulas and ladels. Instantly these everyday kitchen essentials now become works of art when sorted, organized and simply contained.
If you tire of them in the kitchen, crocks work just as well for decanting powdered soaps in a laundry room, make a perfect, small waste can in a powder room and of course are essential to making sourdough starter or pickles - their original and intended use. 


Clear glass cylinders; Although not vintage, I seem to have a lot of these containers in various sizes. Recently I used a few to organize my sewing notions. Thread of all colors, sorted and stored make for a beautiful, colorful display. My buttons, bobbins and various pins are also now contained in smaller cylinders, making them easy to access and use.
In the future, my glass cylinders may hold cotton balls or Q-tips in my bathroom; matches by the fireplace; or a bunch of flowers on a kitchen window sill.


Vintage rubber stamp holder; Originally, I used mine in my spice organizing video but it also works beautifully in my office holding paper clips, push-pins, binder clips, etc., All are contained in small jars that spin around for easy use and now reside on my desk, making for an interesting, useful display.
The holder could easily be put to good use in my kitchen or sewing area. 

There are so many storage solutions now - it's big business. While I do have my favorite go-to organizers, it's easy to get carried away. Start first with what you have, you never know what clever, stylish solution you may come up with.


Thursday, January 20, 2011

Giving Credit where Credit is Due.


This week I worked on organizing, cleaning out and filing our paperwork for the upcoming tax season. My dining room table looks like an unorganized accountants desk!

This morning I came up to the office to do some more filing and I think I finally solved one of my biggest issues - the filing and reconciling of monthly credit card receipts. To many of you this may sound like a no-brainer. But my old system (I mean pile) wasn't working so well.

I clean out my wallet every week or so then toss the stack into a file basket. Read between the lines - I'm busy, I'll get to it - eventually!  Needless to say the basket would fill up pretty quickly. Maybe it's psychological - (some organizational issues are ya know). Perhaps I don't file them because I don't want to see what's going out as opposed to what's coming in?

Here's the truth; I've never given enough thought to the efficient management of these receipts. I don't like filing and reconciling them. So instead I toss them in a pile and think 'Hey, I'll do it later'. Classic procrastination behavior!

When I receive my regular monthly credit card bills, I immediately open them, check them over, write the date they are due on the outside of the envelope and file them by due date. If there isn't a glaringly weird charge,  I go a head and pay the bill when due.

However I have not been so diligent about reconciling and filing each credit card receipt with each statement. Horror of horrors! I told my mom this the other night. I'm sure she thought, 'I know I taught you better!' She did.

But today, in an Ah-ha! moment (and after spotting some clear plastic zipper envelopes in the office closet) I figured it out! Put an envelope in each of the credit card statements' file folder!  Now when I clean out my wallet, I can toss each receipt into it's proper envelope. I also circle the date on the receipt to make reconciling easier. When the bill is due, match up the receipts, make my notes (sometimes it gets complicated), staple all together and, Ta-da!, it's DONE!

Here's my point; we all do this kind of thing. If we don't like to do something - we put it off. Me too. However - and I know this for a fact - if I spend the time needed to work out a system and tweak it from time to time (all organizational systems take some management), it WILL work!

And here's another - even bigger - point. Whatever you can do to make your life run smoother is worth the time spent. My desk is clear, my receipts are filed and life is good!

Tuesday, January 18, 2011

I'm Just Like You... Maybe a Smidge More Organized


Some clients think of me as a professional organizer. I'm not. I'm a professional who just happens to be organized! 

I'm a stylist and interior designer. My approach to both jobs is the same. A beautiful outcome begins with organization - be it a catalog or magazine shoot or a home remodel. Get that done first and the rest will naturally fall into place.

Now that I've gotten that off my chest, I'd like to take this opportunity to dispel a few other myths:

Myth: Being organized means I'm a perfectionist. 
Reality: I throw my head back and laugh out loud at this one! Most of the time I can easily put my hands on what I need when I need it. But I'm not the only one who lives in this humble abode! In other words - I have been known to get a tinsey-tiny bit miffed when things are not put back where they belong!

Myth: Every nook, crannie, closet, cupboard and drawer is completely organized. 
Reality: I have tried, BUT there are areas best left untouched such as my hubby's office and his fly-tying desk, or my daughter's bedroom and bath (she's away at college - reprieve!) to name a few. Honestly, some battles are just not worth fighting. 

Myth: My home is spotless. 
Reality: It's clean but don't bring your white gloves. I do it myself but there are still just 24 hours in my day. Some gentle coaxing (okay - arm-twisting) to get the family to pitch in, is key to a peaceful 'if mama ain't happy, ain't nobody happy!' kind of balance.

Myth: Every room is fabulously decorated. 
Reality: Each room is a sit-down-put-your-feet-up, put-a-glass-down, make a fort, or have a picnic kind of space. I want Everyone who visits here to be comfortable. If you call that fabulously decorated - then we're talking the same language.

Myth: I live in a simple, clutter-free home. 
Reality: I live in a small home but I have stuff! "A place for everything and everything in it's place" is my mantra as is "everything has to have more than one purpose". If it doesn't fit that bill - it doesn't live here.

Myth: I love to organize.
Reality: The road to grace and beauty begins with organization. I enjoy the challenge of tacking any organizing project and coming up with easy, do-able solutions.

Organizing is a means to a beautiful outcome. If you call on me to sort your piles, go thru your files or clean your tiles, I'll gracefully decline. If you call on me to show you how to live a beautiful, well-designed and organized life - I'm your gal.


Friday, January 14, 2011

Whip your recipes into Shape


Often when I'm hired to work with a client to design a kitchen or organize an existing one, recipe organization is often at the top of the list.

A number of years ago, I had some of the same issues. Piles of recipes torn from magazines and newspapers, recipe cards that sat in a stack awaiting for me to return them to the recipe box (which seldom happened), and lots of cookbooks.

I even lost the checkbook once because of my mess - one of my daughter's favorite stories! When she and I were checking out at the grocery store, I did not have my checkbook with me! We had to run home to get it, couldn't find it and grabbed another one in a panic. (This was long before debit or credit cards were accepted at grocery stores). A good six months later I finally discovered I had scooped it up in my recipe pile and shoved it the recipe file box by mistake!

This prompted me to get my act together. I called in an expert - my mom! But it turned out she didn't have a great system either. Together, over a long weekend, we designed one that would work for both of us.

Below are the steps we took to design an efficient recipe filing system:

• Sort. This takes time. Make piles (sorted by type) of the recipes you already use and want to refer to often, (these will go into your everyday binders). Another pile for recipes you want to try, (these will go into hanging files to refer to later). Toss others that have either lost their appeal or you know you'll probably never attempt. Be honest with yourself.

• Purchase at least two large (3-4") and one small (1-2"), three-ring binders, I like these. The two larger binders are for everyday recipes, (eventually you may need more binders). The smaller binder is for holiday or seasonal recipes. Also buy tabbed page dividers and clear acetate sheet protectors plus one or two desk-top file boxes and hanging files.

• Alphabetize the section dividers by types of recipes, (Appetizers, Beverages, Desserts, etc.) and insert into binders.

• Insert recipe tear-sheets and clippings into the clear sheet protectors -  often you can place two or three recipe clippings onto one side of the protector - I secure them to printer paper with these.

• Clearly label the spines of your binders - for example: Appetizers; Meats and Pasta; Vegetables.

• Now, tackle that pile of recipes you'd like to try. Label hanging files by types of foods/recipes. Mine go from A - Z. I use two desktop files for this purpose. Make it a habit to look through these once a week while making your weekly grocery list, select a new recipe or two and try it. If you'd make it again, file it in your binder. If not, toss it.

• Finally, I keep tried and true recipes cards in a metal file box, alphabetized from A-Z by type of food.

• I also have a vintage letter file box I keep on the desk in my kitchen. When I'm too busy to file the recipes, I'll toss them into this box. Honestly - it quickly becomes a stack rather than a small pile. I need to take my own advice and get to filing!

Getting organized is the first step towards becoming a good cook. Easily finding your family's favorite recipes, and trying new ones makes dinner together that much easier.

BTW, this tip, along with eleven more can be found in my 12 Months of Organizing - A Quarter at a Time 2011 desk calendar.

For more tips, ideas and information about how I can help you to get organized, contact me at tips@beiteversohumble.com or by phone: 425 765-2490.

Wednesday, January 12, 2011

A Bigger Pantry is Seldom a Better Pantry.


A few years ago I was fortunate enough to be able to remodel my kitchen. I lived with an inefficient, counter-less, room-for-one-butt space for almost 14 years. Without going into details, I can tell you that my kitchen was designed by a man who didn't cook! However it did have two, count 'em two, pantries! Not of the behind closed doors, walk-in variety, but of the un-reinforced, un-painted pressboard shelving variety, hidden behind shall we say "less-than-perfect" bi-fold doors. Yuck!

At the top of my list for the new kitchen was a great pantry. I dreamed of one that I could walk into with nice, adjustable shelving, room for linens, space for large counter-top appliances, lots of room for pantry staples as well as Costco over-flow. Extra space for glass and dishware and lighting. In other words - I wanted it all.

However, in all honesty, when I was finally able to really start thinking about and designing the kitchen remodel, I was committed to using the space available without incurring the additional cost of a major structural remodel. I knew I had to re-work the space to make it work, without busting my budget.

The pantry of my dreams was just that - a dream.

But no it wasn't. Instead it was a challenge. For goodness sake, just 3 of us live here. It's not like I was cooking for a family of 10! What I needed was an efficient space, not a big one.

Organization begins with good design. Here are a few things that make my pantry work and work well.

Shallow adjustable shelving; How many times have you gone through your pantry or cupboards, digging for this and that, not finding what you need, purchasing more only to find you actually did have 6 cans of beans and 3 jars of cinnamon? Deep shelves don't work.


Shelving that only goes as high as a normal person can reach; What's the point of shelving if you can't easily access it? Above the pantry I designed a cut out that houses my collection of white pitchers. I use these, just not daily. 


Sturdy pull-out baskets; In one area of the pantry's location, the space against the back wall is deeper. Not wide, just deep. Narrow, pull-out, stainless baskets on rollers make this space work. On the top shelf I use a stainless can dispenser. As I use the can in front, the next one rolls forward from behind. 


Uniform containers for pantry staples; Pasta, rice, sugars, salts, baking essentials, cereal, pancake mix, you name it, decanted into sturdy, uniform-size containers. They not only maximize space but keep foods like these fresher, longer.


Efficient and practical floor storage; Floor space is ideal for tall bottles and large boxes. However having to move these when vacuuming is not easy. I put these items into narrow, galvanized bins (actually planters) that I can easily move while cleaning up.

Finally, by taking a step back and realistically thinking about what I needed as opposed to what I dreamed of, (yes some things had to give), made for a pantry that is beautiful, efficient, cost-effective and dare I say...the pantry of my dreams.

Monday, January 10, 2011

What's for Dinner?


Before I was married, my idea of dinner was Lean Cuisine and a beer. Out of self-preservation, my then-new husband took over in the kitchen. He enjoyed cooking but wasn't passionate about it. He was darn good at combining cream and sherry, pouring it over what was in our fridge and calling it dinner. But, what the hey! I didn't complain. I didn't have to cook and a cream sauce over just about anything makes for good eating. But it also made for a broader backside. You get the picture.   

I wish I could tell you that before spending a fortune on a new wardrobe, I started banging those pots and pans. It took the birth of our daughter for me to get my act together in the kitchen.

Something had to give though and it wasn't going to be the baby or the job! Dinner-making and grocery shopping weren't at the top of my list. My fear was they would become yet another chore to add to my already jam-packed day.

In an 'Ah-ha!' moment, it was at this point that I discovered that being organized is the key to doing what you want (and need) to do, and to doing it well.

Here are a few tips that I hope will help you to get a handle on the grocery shopping and dinner-making for your family.

• Keep a notepad in a convenient spot in your kitchen and add to it as soon as you run out of things. This will become your weekly shopping list.

• Next, look at your calendar. If your week is full of activities there probably is little time to prepare time-consuming meals, so plan accordingly. (A quiet weekend morning works well for this). 

• Take a look in your refrigerator, freezer and pantry to see what you have on hand and begin to build a menu and shopping list based on what you already have.

• Pull out your cookbooks and your tried-and-true favorite recipes. Select 4 or 5 recipes and add the needed ingredients to your weekly shopping list. (I leave open Friday, Saturday and Sunday. These days are always more flexible for me).

• Place your cookbooks and recipes in a convenient spot in your kitchen. Use sticky notes to mark the pages with your chosen recipes. (I reuse the sticky notes week after week).

• Go shopping and buy everything you need for the week. 

There are big pay-offs to organizing your weekly groceries and shopping -  not the least of which are that you save valuable time and money. However, the way I see it - a home-cooked, well-balanced, made-with-love, sit-down-and-share with your family meal, trumps a rip-it-open, preservative-laden, frozen lump any day.

Plus, you just might learn to enjoy your time in the kitchen. I sure did!

Later this week I'll share more organizing tips in the kitchen. Be sure to check in.

For more tips, ideas and information, contact me at tips@beiteversohumble.com
or by phone: 425 765-2490.